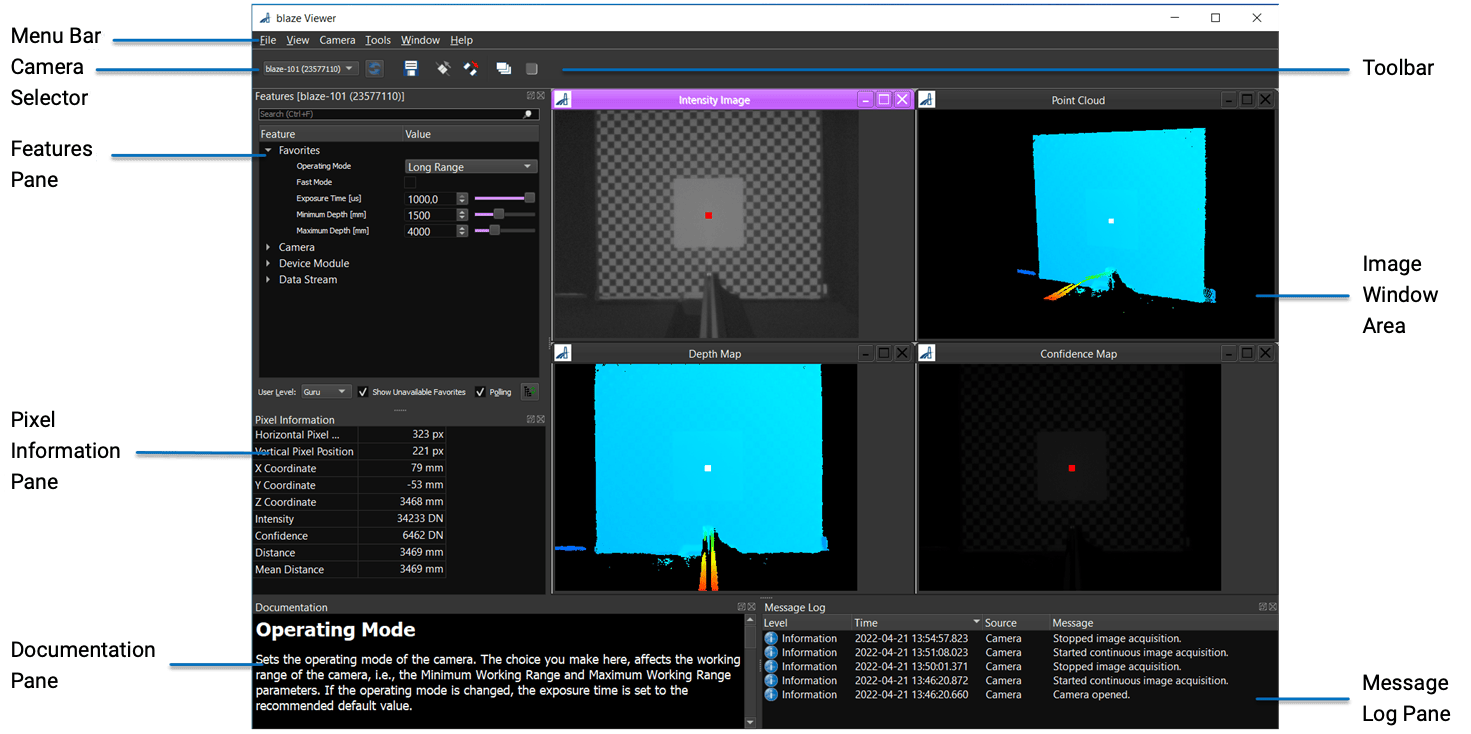
Overview of the blaze Viewer#
The following screenshot shows the different elements of the blaze Viewer.

Menus#
File Menu#
The File menu offers the following commands:
- Save Depth and Image Data: Saves depth and image data as well as camera settings to file. There are various formats available. For more information, see the Saving Depth and Image Data topic.
- Exit: Closes the blaze Viewer.
View Menu#
Use the View menu to select or deselect the panes you want to display.
Camera Menu#
The Camera menu offers the following commands:
- Rescan: Checks whether another camera has been opened.
- Open: Opens a camera, i.e., makes it available for use.
- Close: Closes a camera.
- Continuous Shot: Lets the camera capture images continuously.
- Stop: Stops image capturing.
- Save Features: Saves the current settings of the camera features in a .pfs file, which can be opened in any standard text editor. Image acquisition has to be stopped first before the feature settings can be saved.
- Load Features: Loads a .pfs file containing previously saved settings of camera features.
Tools Menu#
The Tools menu gives you access to the pylon IP Configurator.
Window Menu#
Use the Window menu to open and close image windows and to arrange them in the image window area.
Help Menu#
The Help menu gives you access to various documentation and help features.
- blaze Viewer Help: Opens this topic.
- Basler Product Documentation: Opens the blaze camera documentation.
- Check for Firmware/Software Updates: Takes you to a website where you can check for firmware/software updates.
- Update Camera Firmware: Opens the Software Update Tool in a browser.
- Download DiagnosticInfo.tar.gz: Downloads a file with diagnostic information if you've used the Diagnostic Information feature.
- blaze Samples: Opens the folder containing the blaze programming samples.
- blaze Programmer's Guide: Opens the blaze Programmer's Guide.
- Release Notes: Opens the release notes.
- About blaze Viewer: Opens a dialog with version information about the blaze Viewer.
Panes#
Features#
The Features pane displays all features that are available on the camera that is selected in the camera selector. It also contains the User Level drop-down list where you can select your level of expertise. The available options are Beginner, Expert, and Guru. At the beginner level, the Features pane will only display the most basic camera settings. At the expert level, the Features pane will display the most commonly used camera settings. At the guru level, the Features pane will display all camera features, including the most advanced ones.
You can place the features you use most often in the Favorites category. This allows you quick access and avoids having to navigate the feature tree. Adding a feature to the favorites doesn't remove it from its original category in the feature tree. The favorites remain in place when you close the blaze Viewer.
In the Features pane, you can also select whether to automatically poll the camera in regular intervals for updated parameter values. Alternatively, you can click the Refresh button to refresh the features list manually.
![]()
Pixel Information#
The Pixel Information pane displays information about the pixel that you have selected in one of the image windows. For more information about the Pixel Information pane, see Using the Pixel Information Pane.
Documentation#
The Documentation pane displays information about the feature currently selected in the Features pane. In the example above, the Operating Mode parameter is selected. The pane also contains code snippets that can be useful when writing your own application code.
Message Log#
The Message Log pane displays information about actions carried out with the blaze Viewer, e.g., opening and closing a camera or starting image acquisition. There are different message levels: Information, Warning, and Critical.
Image Window Area#
This pane contains four windows that show the different 2D and 3D views of the target scene.
All panes have buttons for closing the pane and for undocking it from the blaze Viewer window. If a pane is undocked, you can move it around freely on your desktop. If you want to dock it again, follow these steps:
- Drag the pane to the desired position in the window until a dotted rectangle appears.
- Drop the pane.