Recording#
Apart from the usual purposes, sequences of still images can also be used to create data sets for use in pylon AI projects.
The Recording feature is included in the Windows version of the pylon Viewer (AVI output format only). To add the MP4 output format and enable recording under Linux, install the pylon Supplementary Package for MPEG-4 (available for Windows and Linux).
Info
pylon's Recording feature has been developed with ease-of-use as the main focus. As such, performance may not be suitable for all applications. For best results, Basler recommends discussing your application with our sales and support teams in advance to determine the best-fitting hardware and software solutions.
When using the Recording feature on ace 2 Pro camera models, the Compression Beyond feature has to be disabled. If a recording is started and the Compression Beyond feature is enabled, pylon will first disable Compression Beyond on the camera and then start recording.
How It Works#
If the Recording feature is available, you can click the Record button in the pylon Viewer toolbar to start a recording:
The video clips or still images recorded are displayed in the image window of the selected camera. You can play back the resulting videos with any standard media player installed on your computer, e.g., Windows Media Player.
Recordings are saved with the following file naming convention:
<Cameraname>_<SerialNumber>_<YYYY:MM:DD>_<hh:mm:ss:zzz>.<File Extension>
Recording Settings#
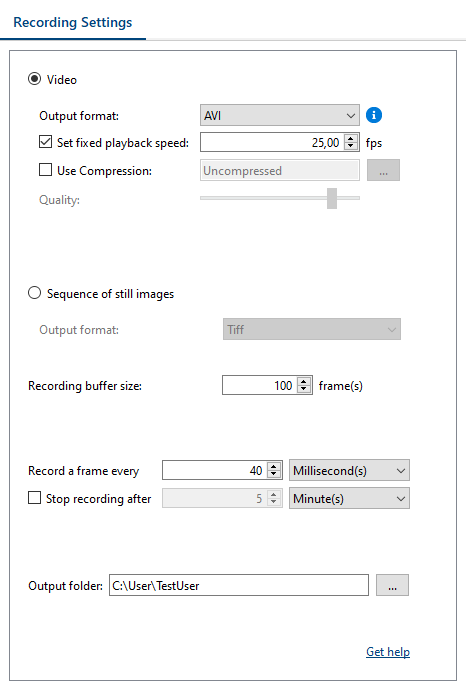
To open the Recording Settings pane, click Window > Recording Settings.

You have the following options:
-
Video: Select this option to record a video clip.
- Output format: Select the desired output format. For more information about output formats, see note below.
Info
Output Formats
The Recording feature offers the AVI and the MP4 formats. Which format is best for you depends on your requirements.
AVI is best for recording high-quality, lossless videos because it allows you to record without compression. The disadvantage is that the file size is limited to 2 GB. Once that threshold is reached, the recording stops and an error message is displayed.
There are no file size restrictions when recording MP4 videos. However, the MP4 format always compresses data to a certain extent which results in loss of detail. Recording of video files with cameras with resolutions of 20 MP or above may fail if the Quality option is set to 80 % or more. To work around that, set Quality to a lower value.
- Set fixed playback speed: Determines at what speed (in frames per second, fps) a recorded video clip is played back. If you don't select this option, the clip is played back in real-time, i.e., at the same speed that it has been recorded.
Info
The minimum playback speed is 1 frame per second. This means that if you recorded a video at the speed of 1 frame per minute, it would still be played back at 1 frame per second.
- Use Compression: (Only available if the AVI output format is selected.) If you select this option and click the … button, the Windows Compression Options dialog opens where you can choose the desired codec.
- Quality: (Only available if the MP4 output format is selected.) This option allows you to adjust the compression rate by setting the desired quality level. A high Quality setting means a low compression rate and vice versa.
-
Sequence of still images: Select this option to record a series of still images.
- Output format: Determines the file format of the resulting images. You can choose between bitmap and tiff files.
-
Recording buffer size: Determines how many images can be stored in the buffer during recording. The image buffer acts like a cache to store images if they can't be read out of the camera quickly enough. You can specify the desired number of images to be stored in the buffer. During recording, the status bar in the image display area shows you how much the buffer is being used (in percent).
-
Record a frame every …: Lets you select the rate at which frames are recorded. You can choose between time intervals or frames.
-
Stop recording after …: Select this option to stop a recording after a certain period of time has passed or a certain number of frames have been recorded.
-
Output folder: Determines where the resulting video clips and images are going to be stored. Use the … button to navigate to your preferred location.
pylon Supplementary Package for MPEG-4#
The pylon Supplementary Package for MPEG-4 is available for Windows and Linux. It enhances the Recording feature in the following ways:
- Under Linux, it enables the Recording feature. Only the MP4 output format will be available.
- Under Windows, the package adds the MP4 output format.
You can download the package from the Basler website.
Image Display Area during Recording#
When you're recording a video or a sequence of still images, a red recording icon appears in the status bar of the image window. You can pause the recording by clicking the Record button on the toolbar, by pressing the F10 button or by clicking Camera in the menu bar and selecting Pause. The recording icon then changes to a pause icon. To restart the recording, click the Pause button again.
The status bar at the bottom of the image window shows you the status of the camera. It also shows the number of recorded and dropped frames as well as the image buffer usage. Frames are dropped when the image buffer has reached its maximum capacity. To resolve that situation, increase the buffer size as required.